Add a Row in Excel Using Power Automate and Microsoft Forms
In the fast-paced world of today, it’s important that data handling is done well. By automating things that you do often, you can get a lot more done. Putting together Microsoft Excel, Power Automate, and Microsoft Forms is a useful way to collect and organize data. In this piece, we’ll look at how Power Automate and Microsoft Forms can be used to add a row in Excel.
Understanding Power Automate and Microsoft Forms
Before we get into the details, let’s get to know the tools we have at hand. Microsoft’s Power Automate is a powerful automation platform that lets you set up workflows to make jobs and processes run automatically. On the other hand, Microsoft Forms is an easy-to-use program that lets you make polls, quizzes, and forms to collect information from people.
Setting Up Your Power Automate Flow
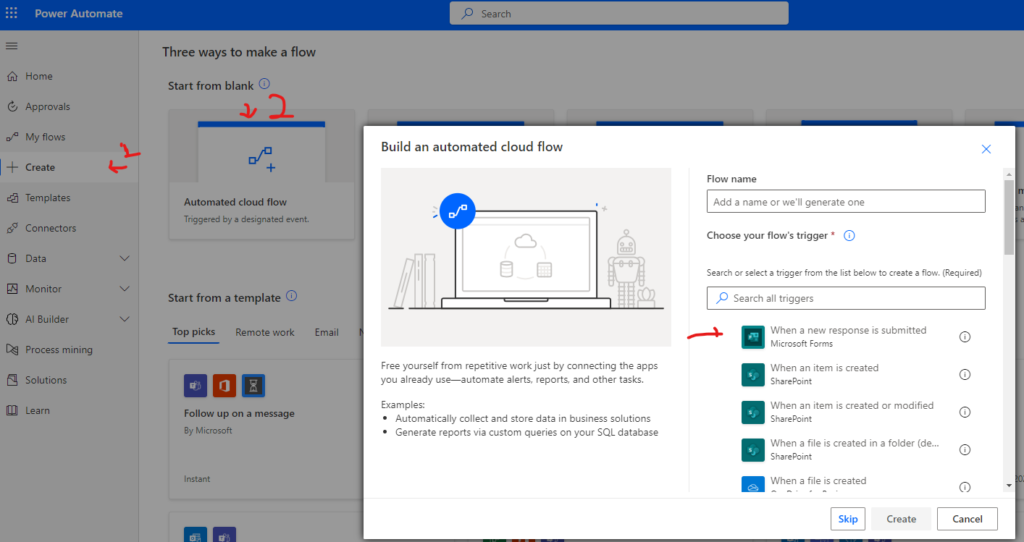
To begin, access Power Automate and create an ‘Automated Cloud’ flow. You’ll select triggers ‘When a new response is submitted ‘. Like this image –

Creating a Microsoft Form for Data Input
Make a Microsoft Form with questions and spaces for entering data that are important. Change how the form looks so that it fits your wants. I created a simple form to collect the Item name, Reorder level, and unit cost. Like this image and named this form ‘STW Demo Add Item Form’.

Building the Power Automate Flow Steps
Here’s where the magic happens. Set up a trigger for when a new form response is submitted. In step use the action ‘Get Response details’ to hold data from the form which we can use in further steps. In the step when ‘When a new response is submitted’, I selected the target form id is ‘STw Demo Add Item Form’ which I create in Microsoft Form. And in next action ‘Get Response Details’ again select same form as I selected ‘STW Demo Add Item Form’ and in ‘Response ID’ map with response id from dynamics value. So, we can hold form response value in dynamics content.

Mapping Form Fields to Excel Columns
Connect the fields on the form to the right columns in Excel. Make sure the data goes from the form to the worksheet in a smooth way. Select ‘Excel Online (Business)’ and in action select ‘Add Row Into a table’ and map the value like given in this image as per your requirement.

Use “OneDrive for Business” in the Location field and “OneDrive” in the Document Library field. As a picture, if your file is stored in OneDrive.
In File, choose the file to which you want to add the thing. Once you choose a file, a list of tables in that sheet will appear. Choose the table where you want to add a row. After choosing a table, it will show all of the columns in that table that can be matched with values from the Dynamics Content of form responses.
Testing and Debugging the Flow
Test the flow with sample form data before putting it into use. Watch how it runs and fix any problems that come up to make sure it works perfectly.
Deploying the Automated Solution
Turn on the Power Automate flow and make it work. Users can fill out the Microsoft Form to collect information. Make sure that the rights and access that are needed are in place.
Conclusion
Using Power Automate and Microsoft Forms to automate Excel jobs changes the game. This can automate any kind of data collection using MS Forms and store it in Excel using Power Automate.
